基于 Spring AI 构建MCP服务端与客户端(含SSE 与STDIO模式完整实现源码)
大家好,我是冰河~~
在当今的 AI 应用开发中,如何让大语言模型安全、灵活地访问外部数据和工具,是一个关键挑战。Anthropic 开源的模型上下文协议(Model Context Protocol, MCP) 为此提供了一种优雅的解决方案。
MCP就像一座“标准化的桥梁”,让模型能够通过统一的接口,动态调用本地文件、数据库或任意 API,从而实现真正“上下文感知”的智能交互。
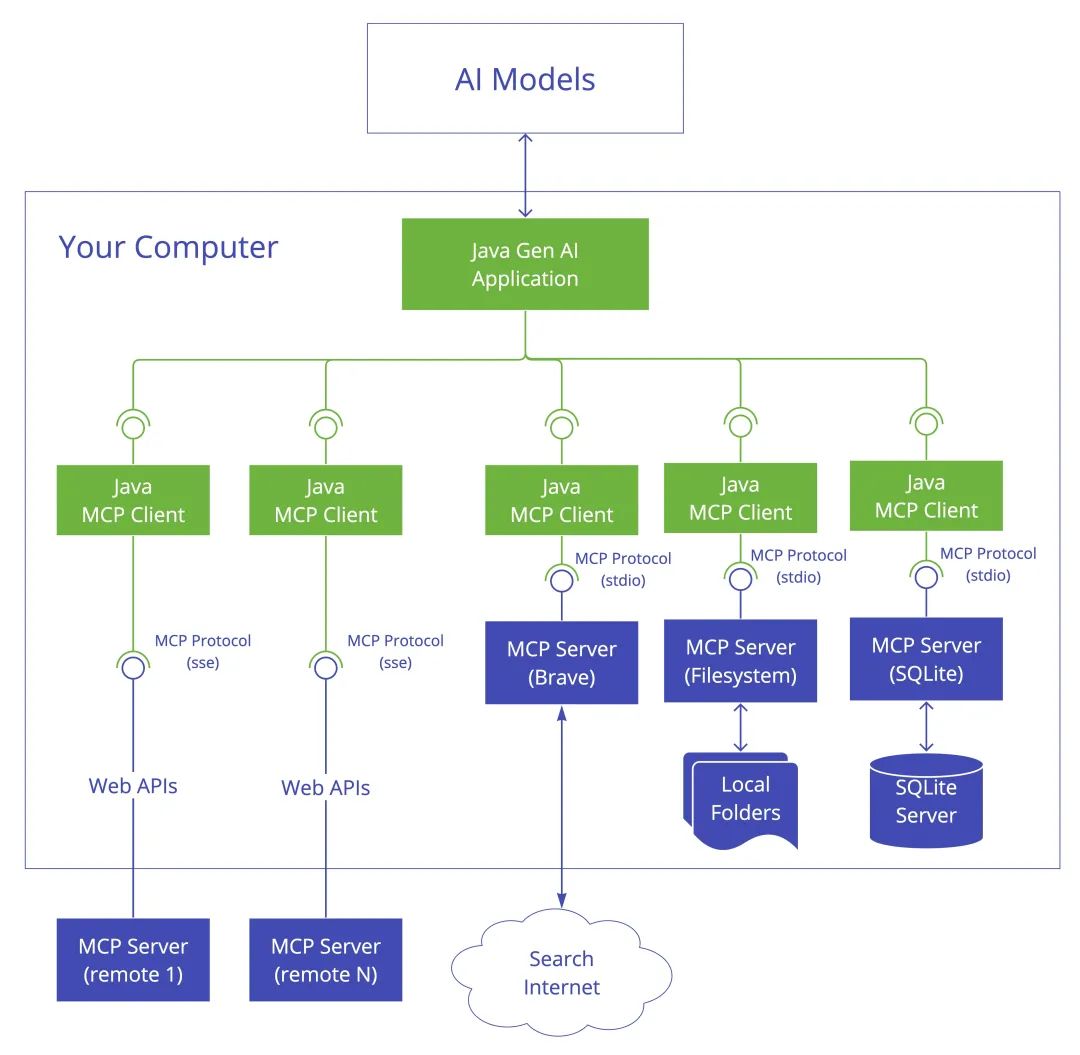
Spring AI 作为 Java 生态中强大的 AI 集成框架,对 MCP 提供了出色的支持。本文将手把手带你基于 Spring AI,从零开始构建一个完整的 MCP 服务端与客户端,并同时实现 SSE(Server-Sent Events) 和 STDIO(标准输入输出) 两种主流通信模式。
一、理解 MCP 与通信模式
在深入代码之前,理解 MCP 的两种通信机制至关重要,它们决定了服务部署和调用的方式。
STDIO 模式 通过进程的标准输入(stdin)和标准输出(stdout)进行通信。这是一种高效、低延迟的本地进程间通信(IPC)方式,通常用于开发工具与本地运行的 MCP 服务器深度集成,例如 IDE 插件调用本地的代码分析服务。
SSE 模式 则是一种基于 HTTP 的服务器推送技术。它允许服务器主动向客户端发送事件流。这种网络通信模式使得客户端和服务端可以部署在不同的机器上,极大地扩展了应用的架构灵活性,适用于远程服务调用和分布式场景。

Spring AI 的模块化设计和对这两种传输模式的原生支持,使得开发者能够根据实际场景灵活选择,并用熟悉的 Spring Boot 风格进行开发,显著降低了技术门槛。
二、构建 SSE 模式 MCP 服务
SSE 模式适用于通过网络远程访问服务的场景。我们将首先构建一个提供天气查询功能的 MCP 服务端。
2.1 创建 MCP 服务端 (mcp-server)
1. 项目依赖配置 (pom.xml)
核心是引入 spring-ai-starter-mcp-server-webflux 依赖以支持 SSE 传输。
<?xml version="1.0" encoding="UTF-8"?>
<project xmlns="http://maven.apache.org/POM/4.0.0" xmlns:xsi="http://www.w3.org/2001/XMLSchema-instance"
         xsi:schemaLocation="http://maven.apache.org/POM/4.0.0 https://maven.apache.org/xsd/maven-4.0.0.xsd">
    <modelVersion>4.0.0</modelVersion>
    <parent>
        <groupId>org.springframework.boot</groupId>
        <artifactId>spring-boot-starter-parent</artifactId>
        <version>3.5.0</version>
        <relativePath/> <!-- lookup parent from repository -->
    </parent>
    <groupId>io.binghe.ai.mcp</groupId>
    <artifactId>mcp-server</artifactId>
    <version>0.0.1-SNAPSHOT</version>
    <name>mcp-server</name>
    <description>mcp-server</description>
    <url/>
    <licenses>
        <license/>
    </licenses>
    <developers>
        <developer/>
    </developers>
    <scm>
        <connection/>
        <developerConnection/>
        <tag/>
        <url/>
    </scm>
    <properties>
        <java.version>21</java.version>
    </properties>
    <dependencies>

        <!-- 只支持 STDIO 传输,使用如下两个依赖 -->
        <!--        <dependency>-->
        <!--            <groupId>org.springframework.ai</groupId>-->
        <!--            <artifactId>spring-ai-starter-mcp-server</artifactId>-->
        <!--        </dependency>-->
        <!--        <dependency>-->
        <!--            <groupId>org.springframework</groupId>-->
        <!--            <artifactId>spring-web</artifactId>-->
        <!--        </dependency>-->

        <!-- 支持 SSE 传输,使用如下依赖 -->
        <dependency>
            <groupId>org.springframework.ai</groupId>
            <artifactId>spring-ai-starter-mcp-server-webflux</artifactId>
        </dependency>

        <dependency>
            <groupId>org.json</groupId>
            <artifactId>json</artifactId>
            <version>20210307</version>
        </dependency>
        <dependency>
            <groupId>org.projectlombok</groupId>
            <artifactId>lombok</artifactId>
        </dependency>
    </dependencies>

    <dependencyManagement>
        <dependencies>
            <dependency>
                <groupId>org.springframework.ai</groupId>
                <artifactId>spring-ai-bom</artifactId>
                <version>1.0.0-M7</version>
                <type>pom</type>
                <scope>import</scope>
            </dependency>
        </dependencies>
    </dependencyManagement>
    <repositories>
        <repository>
            <id>spring-milestones</id>
            <name>Spring Milestones</name>
            <url>https://repo.spring.io/milestone</url>
            <snapshots>
                <enabled>false</enabled>
            </snapshots>
        </repository>
        <repository>
            <id>spring-snapshots</id>
            <name>Spring Snapshots</name>
            <url>https://repo.spring.io/snapshot</url>
            <releases>
                <enabled>false</enabled>
            </releases>
        </repository>
        <repository>
            <id>aliyunmaven</id>
            <name>aliyun</name>
            <url>https://maven.aliyun.com/repository/public</url>
        </repository>
    </repositories>
    <build>
        <plugins>
            <plugin>
                <groupId>org.springframework.boot</groupId>
                <artifactId>spring-boot-maven-plugin</artifactId>
            </plugin>
        </plugins>
    </build>

</project>
2. 实现天气查询工具 (WeatherService.java)
定义一个 Spring Service,其中的方法通过 @Tool 注解暴露为 MCP 工具。
package io.binghe.ai.mcp.mcpserver.weather;

import lombok.extern.slf4j.Slf4j;
import org.json.JSONArray;
import org.json.JSONObject;
import org.springframework.ai.tool.annotation.Tool;
import org.springframework.ai.tool.annotation.ToolParam;
import org.springframework.beans.factory.annotation.Value;
import org.springframework.http.ResponseEntity;
import org.springframework.stereotype.Service;
import org.springframework.web.client.RestTemplate;

import java.io.UnsupportedEncodingException;
import java.net.URLEncoder;

@Service
@Slf4j
public class WeatherService {

    private static final String BASE_URL = "http://api.openweathermap.org/data/2.5/weather";

    @Value("${OPEN_WEATHER_API_KEY}")
    private String OPEN_WEATHER_API_KEY;

    public RestTemplate restTemplate = new RestTemplate();

    @Tool(description = "获取指定城市的当前天气情况,返回格式化后的天气报告")
    public String getWeather(@ToolParam(description = "城市名称必须是英文,例如:London 或者 Beijing") String city) throws UnsupportedEncodingException {
        log.info("====调用了查询天气=====");
        String query = String.format("?q=%s&APPID=%s&units=metric&lang=zh_cn",
                URLEncoder.encode(city, "UTF-8"),
                URLEncoder.encode(OPEN_WEATHER_API_KEY, "UTF-8"));
        ResponseEntity<String> responseEntity = restTemplate.getForEntity(BASE_URL + query, String.class);
        if (responseEntity.getStatusCode().is2xxSuccessful()) {
            String body = responseEntity.getBody();
            JSONObject data = new JSONObject(body);
            JSONObject main = data.getJSONObject("main");
            JSONArray weatherArray = data.getJSONArray("weather");
            JSONObject weather = weatherArray.getJSONObject(0);
            JSONObject wind = data.getJSONObject("wind");
            String weatherDescription = weather.optString("description", "无描述");
            double temperature = main.optDouble("temp", Double.NaN);
            double feelsLike = main.optDouble("feels_like", Double.NaN);
            double tempMin = main.optDouble("temp_min", Double.NaN);
            double tempMax = main.optDouble("temp_max", Double.NaN);
            int pressure = main.optInt("pressure", 0);
            int humidity = main.optInt("humidity", 0);
            double windSpeed = wind.optDouble("speed", Double.NaN);
            return String.format("""
                    城市: %s
                    天气描述: %s
                    当前温度: %.1f°C
                    体感温度: %.1f°C
                    最低温度: %.1f°C
                    最高温度: %.1f°C
                    气压: %d hPa
                    湿度: %d%%
                    风速: %.1f m/s
                    """, data.optString("name", city),
                    weatherDescription,
                    temperature,
                    feelsLike,
                    tempMin,
                    tempMax,
                    pressure,
                    humidity,
                    windSpeed);
        }
        return null;
    }
}
3. 注册工具并启动应用
在启动类中,将 WeatherService 注册为 ToolCallbackProvider Bean。
package io.binghe.ai.mcp.mcpserver;

import io.binghe.ai.mcp.mcpserver.weather.WeatherService;
import org.springframework.ai.tool.ToolCallbackProvider;
import org.springframework.ai.tool.method.MethodToolCallbackProvider;
import org.springframework.boot.SpringApplication;
import org.springframework.boot.autoconfigure.SpringBootApplication;
import org.springframework.context.annotation.Bean;
import org.springframework.web.reactive.config.EnableWebFlux;

@SpringBootApplication
@EnableWebFlux
public class McpServerApplication {

    public static void main(String[] args) {
        SpringApplication.run(McpServerApplication.class, args);
    }

    @Bean
    public ToolCallbackProvider weatherTools(WeatherService weatherService) {
        return MethodToolCallbackProvider.builder().toolObjects(weatherService).build();
    }
}
4. 应用配置 (application.properties)
spring.application.name=mcp-server
#指定 MCP 服务器的名称为 spring-ai-mcp-weather
spring.ai.mcp.server.name=spring-ai-mcp-weather

#配置应用监听的端口为 8081
server.port=8081

#禁用 Spring Boot 启动时的横幅(Banner)显示,对于使用 STDIO 传输的 MCP 服务器,禁用横幅有助于避免输出干扰。
spring.main.banner-mode=off

#如下参数启用并设置为空,将禁用控制台日志输出格式,减少输出干扰
logging.pattern.console=

#配置日志文件的输出路径,将日志写入指定的文件中
logging.file.name=./mcp-weather-stdio-server.log

#访问 OpenWeather API 的密钥,自己获取每天可免费调用100次
OPEN_WEATHER_API_KEY=

#设置日志的根级别为 INFO
logging.level.root=INFO
2.2 创建 MCP 客户端 (mcp-client)
1. 项目依赖配置 (pom.xml)
客户端需要引入 MCP 客户端和特定大模型(如通义千问)的 Starter。
<?xml version="1.0" encoding="UTF-8"?>
<project xmlns="http://maven.apache.org/POM/4.0.0" xmlns:xsi="http://www.w3.org/2001/XMLSchema-instance"
         xsi:schemaLocation="http://maven.apache.org/POM/4.0.0 https://maven.apache.org/xsd/maven-4.0.0.xsd">
    <modelVersion>4.0.0</modelVersion>
    <parent>
        <groupId>org.springframework.boot</groupId>
        <artifactId>spring-boot-starter-parent</artifactId>
        <version>3.5.0</version>
        <relativePath/> <!-- lookup parent from repository -->
    </parent>
    <groupId>io.binghe.ai.mcp</groupId>
    <artifactId>mcp-client</artifactId>
    <version>0.0.1-SNAPSHOT</version>
    <name>mcp-client</name>
    <description>mcp-client</description>
    <url/>
    <licenses>
        <license/>
    </licenses>
    <developers>
        <developer/>
    </developers>
    <scm>
        <connection/>
        <developerConnection/>
        <tag/>
        <url/>
    </scm>
    <properties>
        <java.version>17</java.version>
    </properties>
    <dependencies>
        <dependency>
            <groupId>org.springframework.boot</groupId>
            <artifactId>spring-boot-starter-web</artifactId>
        </dependency>

        <dependency>
            <groupId>org.springframework.boot</groupId>
            <artifactId>spring-boot-starter-test</artifactId>
            <scope>test</scope>
        </dependency>

        <dependency>
            <groupId>org.springframework.ai</groupId>
            <artifactId>spring-ai-starter-mcp-client</artifactId>
        </dependency>

        <!-- 导入 Spring AI - Anthropic 依赖-->
        <!--        <dependency>-->
        <!--            <groupId>org.springframework.ai</groupId>-->
        <!--            <artifactId>spring-ai-starter-model-anthropic</artifactId>-->
        <!--        </dependency>-->

        <!-- 导入 Spring AI - OpenAI 依赖-->
        <!--        <dependency>-->
        <!--            <groupId>org.springframework.ai</groupId>-->
        <!--            <artifactId>spring-ai-starter-model-openai</artifactId>-->
        <!--        </dependency>-->

        <!-- 导入Spring AI Alibaba - 通义千问依赖 -->
        <dependency>
            <groupId>com.alibaba.cloud.ai</groupId>
            <artifactId>spring-ai-alibaba-starter</artifactId>
            <version>1.0.0-M6.1</version>
        </dependency>
    </dependencies>
    <dependencyManagement>
        <dependencies>
            <dependency>
                <groupId>org.springframework.ai</groupId>
                <artifactId>spring-ai-bom</artifactId>
                <version>1.0.0-M7</version>
                <type>pom</type>
                <scope>import</scope>
            </dependency>
        </dependencies>
    </dependencyManagement>

    <build>
        <plugins>
            <plugin>
                <groupId>org.springframework.boot</groupId>
                <artifactId>spring-boot-maven-plugin</artifactId>
            </plugin>
        </plugins>
    </build>
</project>
2. 配置与交互客户端 (McpClientApplication.java)
核心是构建一个 ChatClient,并为其注入通过 SSE 连接到我们服务端的工具能力。
package io.binghe.ai.mcp.mcpclient;

import io.modelcontextprotocol.client.McpSyncClient;
import org.springframework.ai.chat.client.ChatClient;
import org.springframework.ai.chat.client.advisor.MessageChatMemoryAdvisor;
import org.springframework.ai.chat.memory.InMemoryChatMemory;
import org.springframework.ai.mcp.SyncMcpToolCallbackProvider;
import org.springframework.boot.CommandLineRunner;
import org.springframework.boot.SpringApplication;
import org.springframework.boot.autoconfigure.SpringBootApplication;
import org.springframework.context.annotation.Bean;

import java.util.List;
import java.util.Scanner;

@SpringBootApplication
public class McpClientApplication {

    public static void main(String[] args) {
        SpringApplication.run(McpClientApplication.class, args);
    }

    @Bean
    public CommandLineRunner chatbot(ChatClient.Builder chatClientBuilder, List<McpSyncClient> mcpSyncClients) {
        return args -> {
            // 构建聊天客户端
            ChatClient chatClient = chatClientBuilder
                    //设置系统提示,引导 AI 的行为和角色
                    .defaultSystem("你是一个可以查询天气的助手,可以调用工具回答用户关于天气相关问题。")
                    //配置工具回调提供者,使 AI 能调用外部工具
                    .defaultTools(new SyncMcpToolCallbackProvider(mcpSyncClients))
                    //设置对话记忆,使用内存存储对话历史,保持上下文
                    .defaultAdvisors(new MessageChatMemoryAdvisor(new InMemoryChatMemory()))
                    .build();

            // 开始聊天循环
            System.out.println("\n我是你的AI助手。\n");
            try (Scanner scanner = new Scanner(System.in)) {
                while (true) {
                    System.out.print("\n用户: ");
                    String content = scanner.nextLine();
                    System.out.println("\n助手: " +
                            chatClient.prompt(content)
                                    .call()
                                    .content());
                }
            }
        };
    }

}
3. 客户端配置 (application.properties)
关键是指定 SSE 模式的服务端连接地址。
spring.application.name=mcp-client

#指定应用类型为非 Web 应用,适用于命令行工具、批处理任务或仅作为客户端运行的场景
spring.main.web-application-type=none

#使用 Claude LLM,需要在pom.xml中引入对应依赖
#spring.ai.anthropic.api-key=your_anthropic_api_key
#spring.ai.anthropic.chat.options.model=claude-3-haiku-20240307

#使用 Deepseek LLM,需要在pom.xml中引入对应依赖
#spring.ai.openai.api-key=your_deepseek_api_key
#spring.ai.openai.base-url=https://api.deepseek.com
#spring.ai.openai.chat.options.model=deepseek-chat

#使用 通义千问 LLM,需要在pom.xml中引入对应依赖
spring.ai.dashscope.api-key=api-key
spring.ai.dashscope.chat.options.model=qwen-plus


#STDIO 模式,指定 MCP 客户端的服务器配置文件路径
#spring.ai.mcp.client.stdio.servers-configuration=classpath:/mcp-servers-config.json

#SSE 模式,配置名为 server1 的 MCP 服务器连接,远程连接到指定的服务器地址
spring.ai.mcp.client.sse.connections.server1=http://localhost:8081
2.3 测试 SSE 模式
查看完整文章
加入冰河技术知识星球,解锁完整技术文章、小册、视频与完整代码
写在最后
在冰河技术知识星球, 《AI智能代码审查平台》 已完结,同时,《AI全链路短剧生成平台》、《智能代码审查系统》 已完结, 《多智能体协作与AI工作台》 项目热更中,还有其他二十几个项目,像实战Claude Code、AI知识库系统、智流助手平台、智能成语挑战赛项目、多轮AI智能对话系统、一站式AI智能平台、AI智能客服系统、AI智能问答系统、实战AI大模型、手写高性能敏组件、手写线程池、手写高性能SQL引擎、手写高性能Polaris网关、手写高性能熔断组件、手写通用指标上报组件、手写高性能数据库路由组件、手写分布式IM即时通讯系统、手写Seckill分布式秒杀系统、手写高性能RPC、实战高并发设计模式、简易商城系统等等。
这些项目的需求、方案、架构、落地等均来自互联网真实业务场景,让你真正学到互联网大厂的业务与技术落地方案,并将其有效转化为自己的知识储备。
值得一提的是:冰河自研的Polaris高性能网关比某些开源网关项目性能更高,目前正在热更AI一体化项目,也正在实现MCP,全程带你分析原理和手撸代码。
你还在等啥?不少小伙伴经过星球硬核技术和项目的历练,早已成功跳槽加薪,实现薪资翻倍,而你,还在原地踏步,抱怨大环境不好。抛弃焦虑和抱怨,我们一起塌下心来沉淀硬核技术和项目,让自己的薪资更上一层楼。
🚀PS:目前已开通最大优惠:长按或扫码加入星球立减30,注意:随着项目和专栏的更新,星球也即将涨价!!

目前,领券加入星球就可以跟冰河一起学习《实战Claude Code》、《多轮AI智能对话系统》、《一站式AI智能平台》、《AI智能客服系统》、《AI智能问答系统》、《实战AI大模型》、《手写高性能Redis组件》、《手写高性能脱敏组件》、《手写线程池》、《手写高性能SQL引擎》、《手写高性能Polaris网关》、《手写高性能RPC项目》、《分布式Seckill秒杀系统》、《分布式IM即时通讯系统》《手写高性能通用熔断组件项目》、《手写高性能通用监控指标上报组件》、《手写高性能数据库路由组件》、《手写简易商城脚手架项目》、《Spring6核心技术与源码解析》和《实战高并发设计模式》,从零开始介绍原理、设计架构、手撸代码。
花很少的钱就能学这么多硬核技术、中间件项目和大厂秒杀系统、分布式IM即时通讯系统,AI大模型项目,比其他培训机构不知便宜多少倍,硬核多少倍,如果是我,我会买他个十年!
加入要趁早,后续还会随着项目和加入的人数涨价,而且只会涨,不会降,先加入的小伙伴就是赚到。
另外,还有一个限时福利,邀请一个小伙伴加入,冰河就会给一笔 分享有奖 ,有些小伙伴都邀请了50+人,早就回本了!
其他方式加入星球
- 链接 :打开链接 http://m6z.cn/6aeFbs 加入星球。
- 回复 :在公众号 冰河技术 回复 星球 领取优惠券加入星球。
特别提醒: 苹果用户进圈或续费,请加微信 hacker_binghe 扫二维码,或者去公众号 冰河技术 回复 星球 扫二维码加入星球。
好了,今天就到这儿吧,我是冰河,我们下期见~~